

Most modern operating systems, for mobile devices and for workstations, offer VPN clients which support proper IPsec IKEv2 MSCHAPv2. However, there are still some stubborn vendors that in 2024, still offer only L2TP behind IPsec (or PPP if we are unlucky) plus OpenVPN. As stated in many places like Gentoo Wiki IPsec/L2TP is considered a legacy VPN protocol. OpenVPN is not suited for any form of refined connectivity other than simple client-server, plus it’s not supported out-of-the-box in modern OSes.
In this article, I’ll describe how to add this legacy option for use with Synology DSM in strongSwan, that simultaneously hosts IPsec IKEv2 MSCHAPv2 VPN.
Intro #
I have my strongSwan based IPsec IKEv2 MSCHAPv2 VPN server set up for years, and it serves two functions. First, it provides site-to-site between servers in different DCs to encrypt traffic over direct connect. Second is for operator connection from workstation (or mobile devices) to all VMs hosted by servers.
Recently, I wanted to connect my home Synology NAS to this virtual network, so I could perform some additional backups directly there. It turned out, that my only options are PPTP (which is obsolete and insecure), OpenVPN (which is terrible to set up, plus DSM only accepts ovpn file uploaded once per profile) and L2TP/IPsec. Apparently Synology isn’t concerned about that, as users complain publicly on the Internet and my direct inquiry about it was met with generic “Thank you for your feature request, information forwarded to responsible development team”.
For some time, I was thinking about WireGuard, as my home router running AsusWRT-Merlin supports it (alongside OpenVPN and PPTP/L2TP). However, it seemed more reasonable to configure a single device that needs access and avoid issues related to making a bridge from the entire home network to the server network. Plus, it’s unlikely we’ll see WireGuard in DSM, as it’s not yet so widely used in large networks. That said, I’ll try it at some stage, but for now, IPsec just works for me.
Finding out what we need #
To find out required connection parameters, let’s check DSM Knowledge Center page for VPN client. In the section for L2TP/IPsec, we’re greeted with classic should be provided by the administrator of the VPN server, which seems to treat us as not worthy of being administrators ourselves.
The only thing we can figure out from there is that there are four authentication methods available - PAP, CHAP, MS CHAP and MS CHAP v2. We’ll go with MS CHAP v2 as that’s what I use for other VPN profiles.
Something else is not explicitly said, but shows only in the Web UI - we’re restricted to username/password auth for L2TP and forced to use PSK for IPsec.
Ensuring current server has proper configuration #
For some context about my pre-existing setup, here’s an old article in Polish I made 2 years ago.
Software #
Configuration on Linux is heavily based on Gentoo Wiki and adriangin.wordpress.com.
We need to ensure we have all the required packages, for Ubuntu Server they are strongswan libstrongswan-extra-plugins xl2tpd.
The only piece of configuration work omitted from this article is how to set up certificates - it’s already described on Gentoo Wiki and in that old article.
Firewall #
Then we need to make sure that the firewall is set correctly. For our purposes, it must allow udp/500 and udp/4500 while dropping udp/1701. It’s described here and boils down to letting udp/1701 in only when matches policy ipsec. In my setup, where entire traffic is dropped, I only had to add this rule:
iptables-legacy -t filter -I INPUT \
  -p udp -m policy --dir in --pol ipsec \
  -m udp --dport l2tp \
  -j ACCEPT
At some stage, I’ll add this to my iptables wrapper - ogniochron, for now, I’m using a workaround in the configuration shown later.
Making changes #
xl2tpd #
First, we’ll configure xl2tpd, which provides L2TP.
The main configuration file is /etc/xl2tpd/xl2tpd.conf and contains at least two sections. global configures where the daemon listens at and whether it should perform additional client filtering. Each lns section defines connection profiles. They allow us to set DHCP-like service (which isn’t ideal as we mix up layers, but for setup dedicated for single special-snowflake system it’s OK) and point to further configuration of PPP.
[global]
port = 1701
access control = no

[lns default]
ip range = RANGE_START - RANGE_END
local ip = GATEWAY
require authentication = yes
name = LinuxVPN
pppoptfile = /etc/ppp/options.xl2tpd
RANGE_START and RANGE_END are the first and last IPs to be handed over and GATEWAY is an additional IP to be set on the server (can be an existing one), which will act as a gateway for clients.
The /etc/ppp/options.xl2tpd is a set of static options that ensure the link layer works as expected. The last option, ms-dns is mainly for Windows clients.
noccp
auth
mtu 1410
mru 1410
nodefaultroute
proxyarp
silent
debug
ms-dns IP-OF-DNS
The last piece of configuration lies in /etc/ppp/chap-secrets and is very similar in nature to /etc/ipsec.secrets. Of course, ideally we should be using some identity provider like LDAP or RADIUS, but in simple and core systems, a file on a disk is good enough.
The format is:
# Secrets for authentication using CHAP
# client  server  secret      IP addresses
username * password ip_to_handover
ip_to_handover is IP to be set via DHCP to connecting client. It can be omitted with * and then it’ll be picked up from ip range defined in xl2tpd.conf.
strongSwan #
Next, we need to configure strongSwan, which will cover the IPsec part of the connection. One important aspect of my configuration is that it was originally made using the old approach, before swanctl. Some help how to adapt those two config formats can be obtained from strongSwan docs.
/etc/ipsec.conf requires just one connection section to be added:
conn synology
  type=transport
  auto=add

  authby=secret
  rekey=no
  keyingtries=100
  pfs=no

  left=%any
  leftid=%any
  right=%any

  ike=aes128-sha1-modp1536
  esp=aes128-sha1-modp1536

  rightupdown=/usr/sbin/iptables-legacy -t filter -I INPUT -p udp -m policy --dir in --pol ipsec -m udp --dport l2tp -j ACCEPT
  leftupdown=/usr/sbin/iptables-legacy -t filter -I INPUT -p udp -m policy --dir in --pol ipsec -m udp --dport l2tp -j ACCEPT
Some important options are:
conn synologydefines profile name as “synology”type=transportis important to allow client to connect to L2TP via IPsecauthby=secretmakes use of PSKikeandespenforce cipher suite for this type of VPNrightupdownandleftupdownare a workaround mentioned earlier, that whitelist connectivity from client to L2TP but only from inside IPsec tunnel
The only thing left is to define PSK, which is just a matter of appending a line to /etc/ipsec.secrets:
%any % any : PSK our_pre_shared_key
Wrapping up and potential debugging #
We now just need to restart two daemons - strongswan-starter.service and xl2tpd.service.
To validate the status of an IPsec tunnel, we can use ipsec status profile_name. For advanced debugging, we need to change Charon logging options - in /etc/strongswan.d/charon-logging.conf, we can set individual subsystems as per strongSwan docs; however, reasonable starting point is default=1 mgr=3 ike=3.
For xl2tpd, it’s easiest to check the system journal - journalctl -fu xl2tpd.service.
Setting up Synology side #
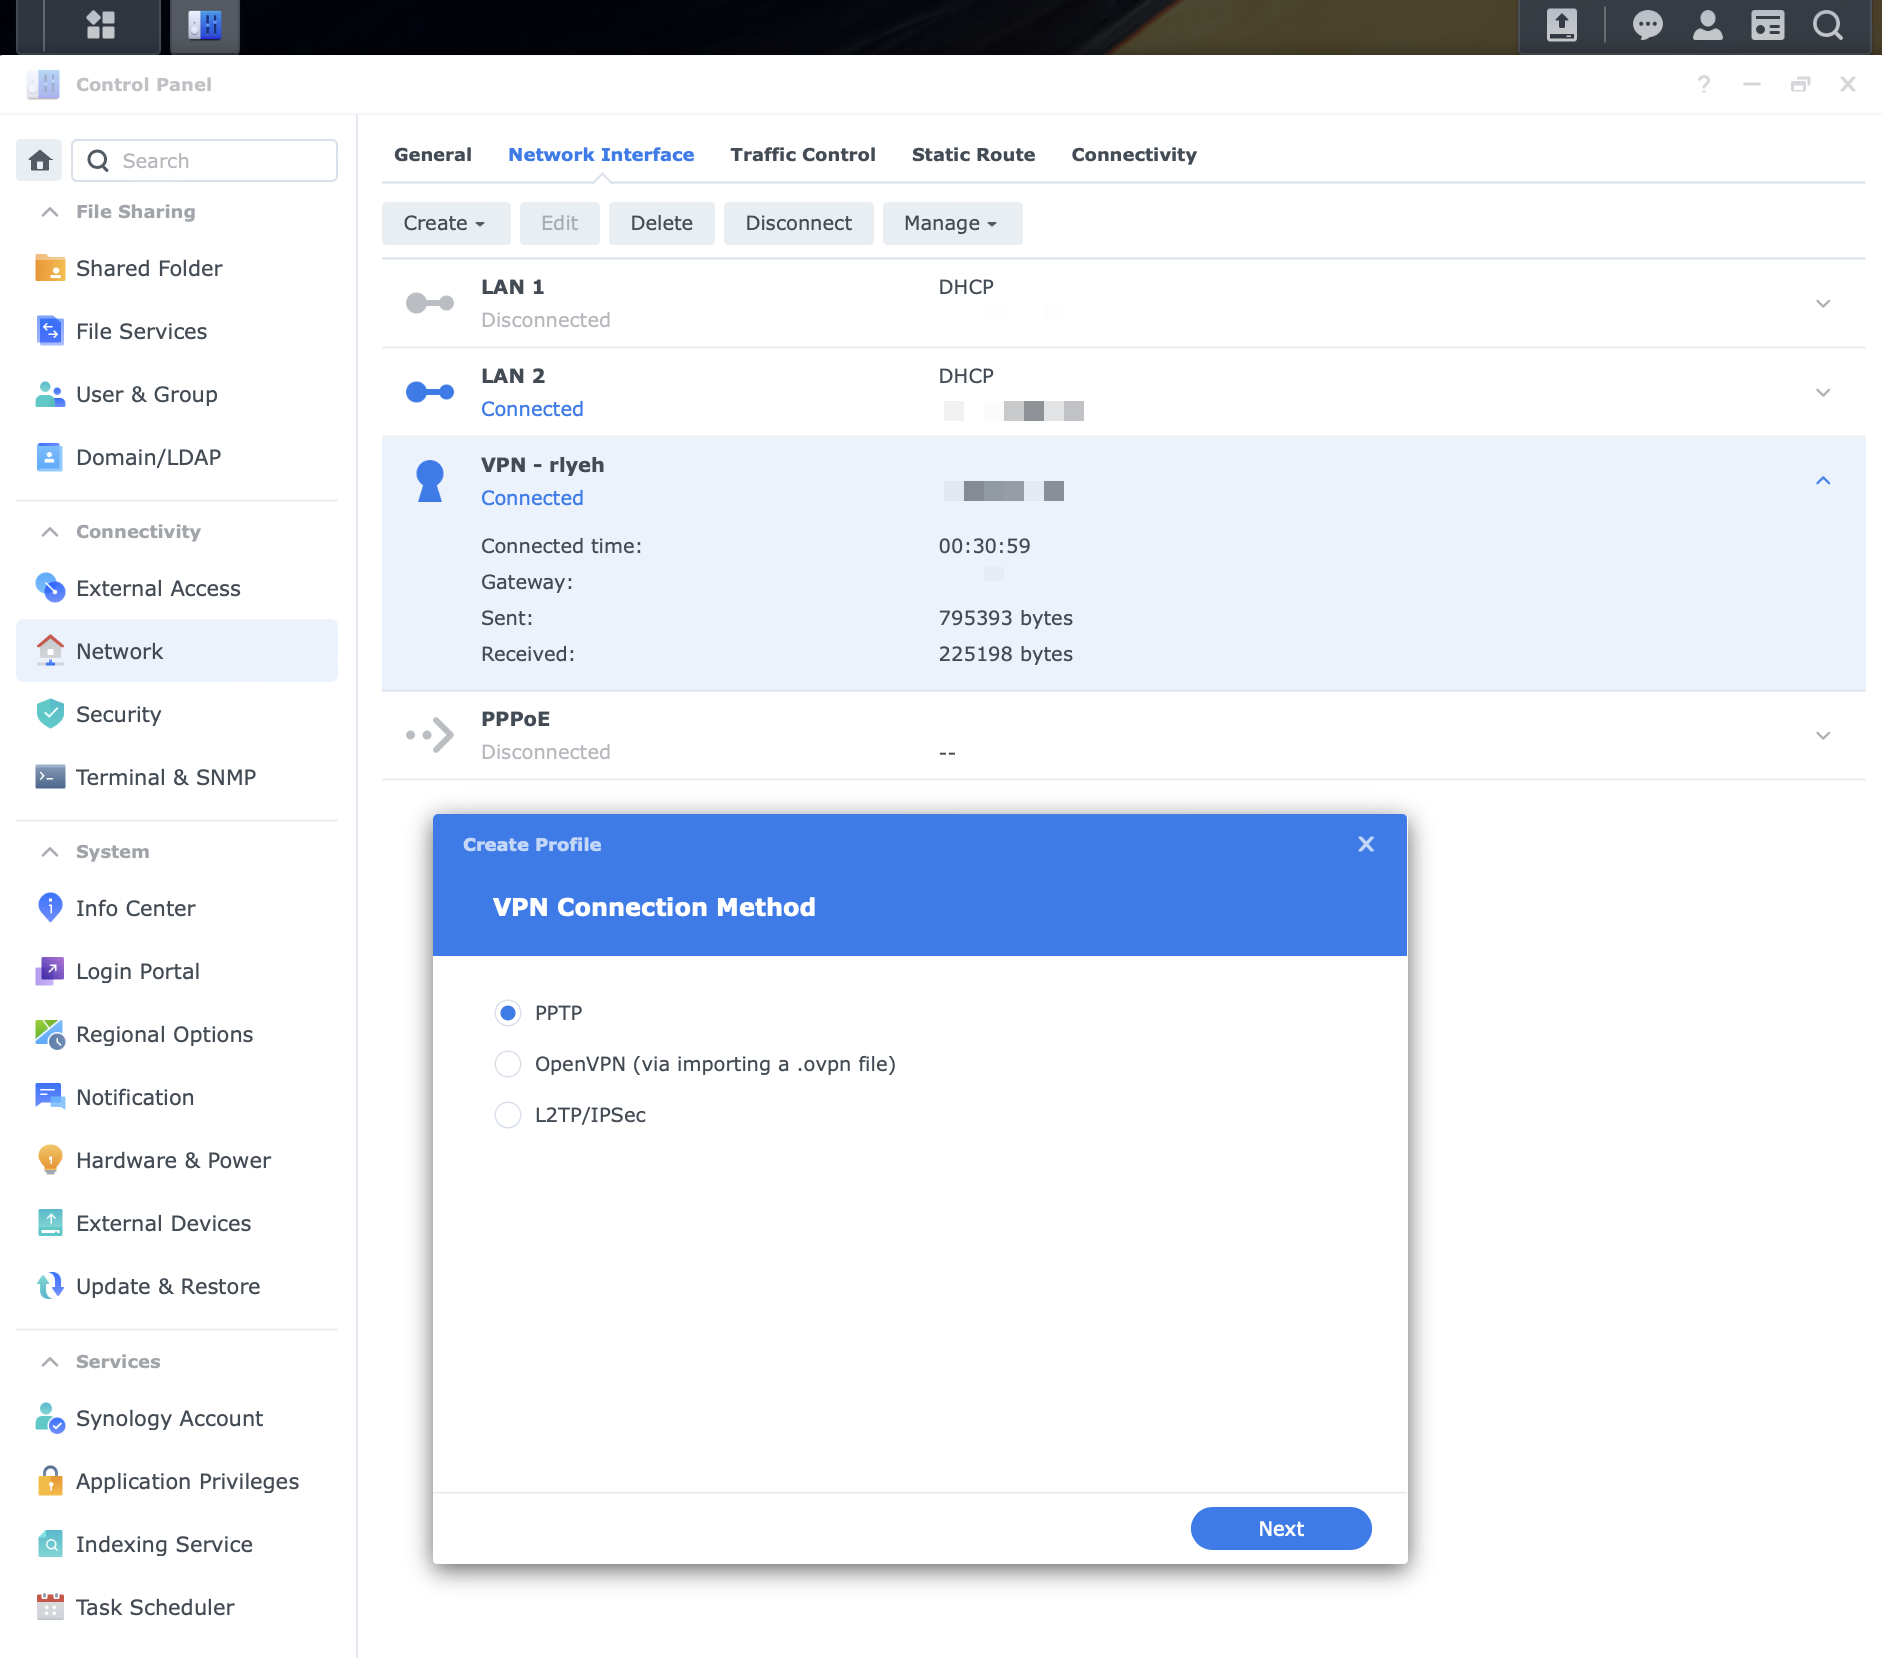
The first step is to locate the wizard in DSM Web UI and select the proper VPN type:
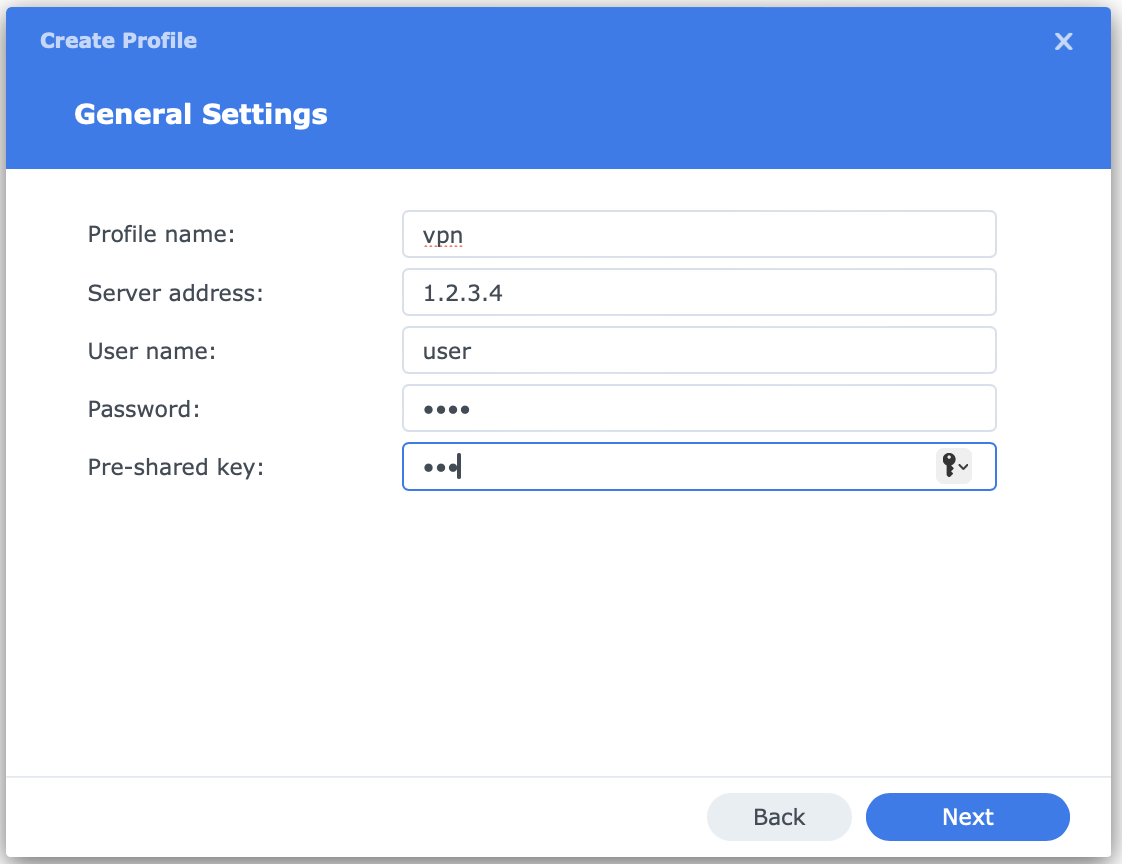
Then, we pass server address (safest to use IP instead of FQDN), username, password and PSK:
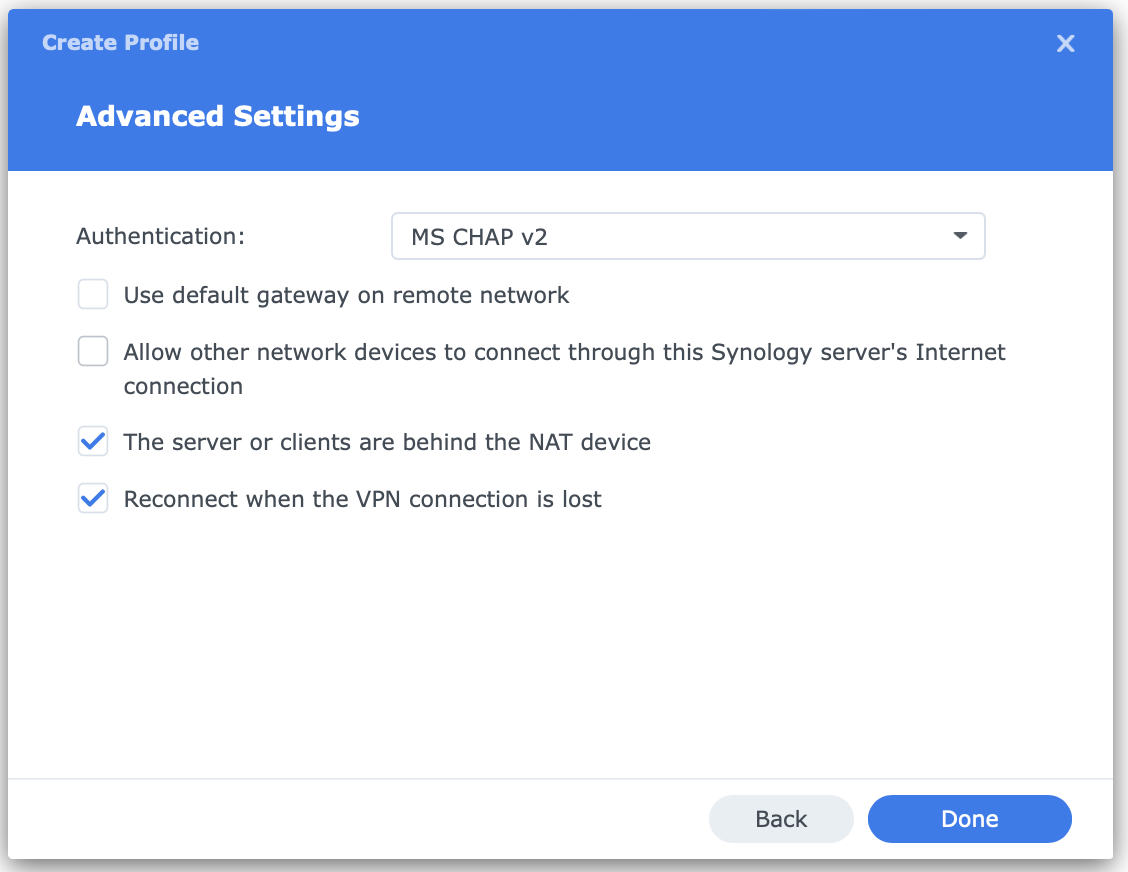
And lastly, there are some options left. Reconnect is optional, but works well. NAT is strictly required if our Synology is behind any type of NAT (that’s what sets udp/l2f instead of udp/l2tp seen in IPsec diagnostics):
Thereafter, we can just click connect, wait several seconds for IP and test connectivity in both directions. Here, having a static IP for xl2tpd client makes sense.
Summing up #
IPsec is hard, but rewarding. While IPsec IKEv2 MSCHAPv2 is easier in properly configured systems, as it covers routing via Kernel instead of delegating responsibility to L2TP, adding support for L2TP/IPsec mode is relatively easy in strongSwan.
The main problem here is that we could only configure one side of the connection - the server, while the managed client in DSM is quite strict in what it can do. And the only reason for that is the ease of using the Web UI, as all options are then converted into normal Linux utilities. However, it does not make DSM a bad product, as there’s only one alternative to a desktop-like experience: proper CLI and config files, which can never be covered by any support or warranty if user is allowed to do anything.